
The technology
How to use Silver
Silver edits inside Apple Photos: select a photo, choose Edit With → Silver, and you get one screen, your photo on one side, a panel of film controls on the other. Every edit is non-destructive, so you can come back and change your mind later; Photos always keeps the original.
Underneath, Silver is a modular platform, not a fixed set of sliders. A look is built from four independent layers, Optics, Chemistry, Grain, and Adjustments, each made of its own building blocks that can be added, removed, and saved separately. Pick a stock and you get a finished look in one tap. Open any layer and every control is real and physically grounded, free to rebuild from scratch if you want to.
You do not need to understand any of this to get a great result today. But there is no ceiling here either: the same node-graph engine that powers Silver’s own built-in film stocks is open to you too, so if you want to go past film emulation entirely, that is fully within reach.
The panel is organized as five sections, top to bottom: Film Stock, Adjustments, Optics, Grain, and Film Chemistry. This page walks through them in that order, then covers how a stock’s saved layers can be mixed and matched, and how to build your own, from a quick tweak all the way to a hand-authored node graph.
As the software is in early alpha, this page will be under constant updating. The current beta build may differ on some aspects. The page will always get updated to reflect the latest build in due time.
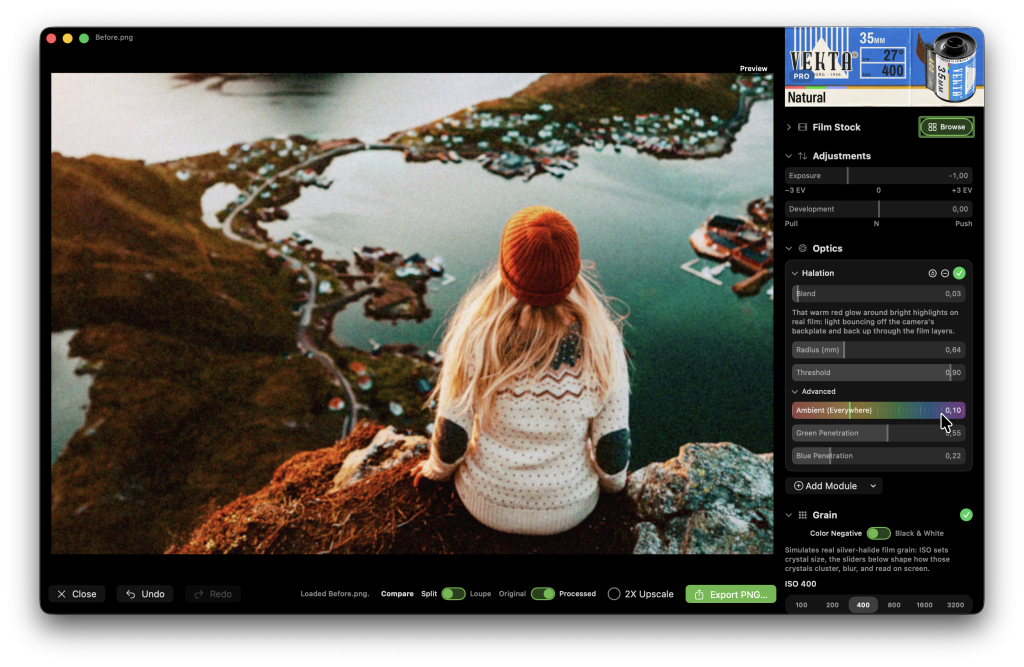
Every Silver stock is built the way film actually works: light exposes silver-halide crystals, chemistry develops them into dye, and grain is a physical consequence of that process. Not a texture laid on top afterward.
00
Quick start
The fastest path from “just opened it” to “this looks like film.”
Exposure
−3 – +3 EV
default 0
A straightforward brightness fix, the same stops a camera’s own exposure compensation uses. Use it to correct a shot that came in too dark or too bright, before you start grading it, not a creative effect on its own.
Development
−2 – +2
default 0 · Pull / N / Push
Push and pull processing: rating film faster or slower than box speed, then adjusting development time to compensate. One slider drives three things together: contrast, grain character, and color saturation; the way a single push/pull decision affects all of them at once on real film. Push (positive) punches up contrast and grain; Pull (negative) flattens and softens both.
That’s it, all the other controls are handled by the default loaded Golden Glow -silverstock preset.
But to get a more specific look, keep reading!
01
Film Stock
A film stock is a saved recipe. One file that bundles a grain pattern with optics, chemistry, exposure and push and pull settings. This section is where you browse, apply and manage them.
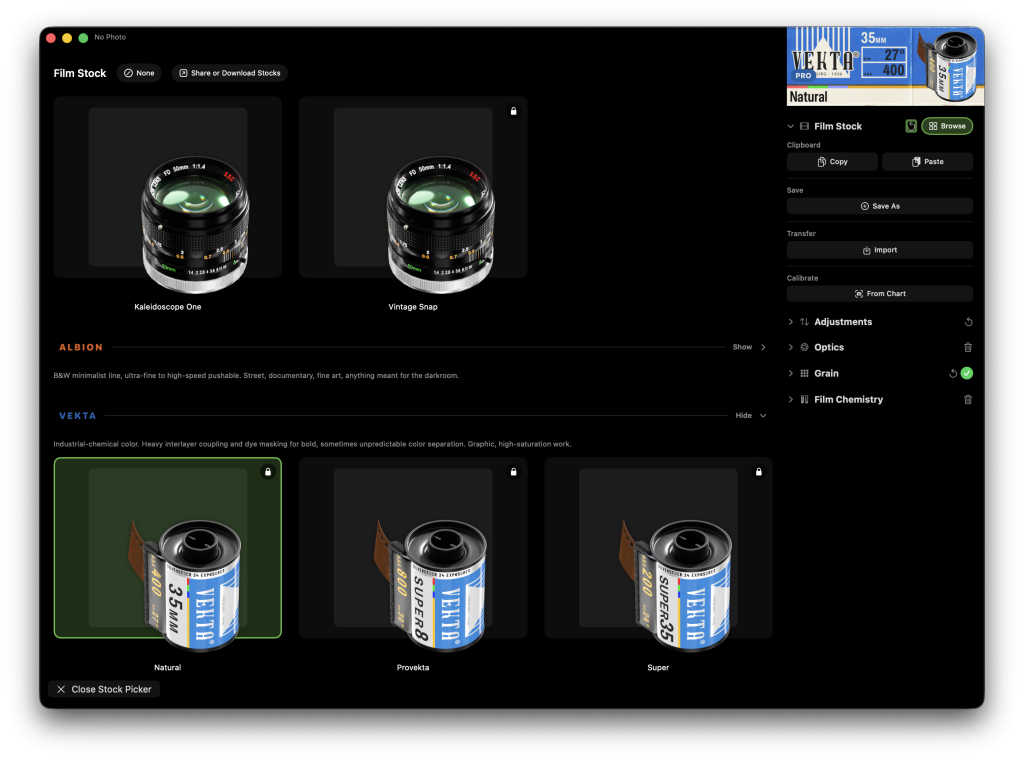
Saving, exporting, and publishing a film stock happens in the companion app, Silver Grain Studio. The Photos extension can apply a stock but not author one.
BROWSE
Opens a full-screen grid of every stock you’ve saved or imported, grouped by brand: Ambra, Verda, Vekta, Albion, and White Label for anything unbranded. Each tile shows your own photo rendered in that stock’s look, so you’re comparing against the actual shot, not a generic swatch; tap None to clear all settings back to a blank slate.
Calibrate
Allows you to capture a look from a real film scan.
Save
Save your edits to an existing silverstock, or create a new stock from the current settings.
Transfer
Export a silverstock for sharing, or import new silverstock for your use. Stocks can be shared in the marketplace.
Customize
Rename a silverstock, or switch its brand for something else. These options are not available for built-in silverstock files.
Clipboard
Copies the entire current look, every slider in every section, to the system clipboard, so you can paste the exact same edit onto a different photo without saving it as a silverstock first. Useful for a quick one-off match across a couple of shots.
Delete
Deletes the currently loaded silverstock file. This operation cannot be undone.
2X Upscale
Next to the Export PNG / Export All button in the bottom bar. Upscales the source 2x before grain, so the export comes out at double width and height (4x the pixel count). Export-only, the live preview always renders at normal size regardless of this toggle.
02
Adjustments
A few hands-on controls for the shot itself, not the film, the closest thing Silver has to conventional photo-editing sliders.
Exposure
−3 – +3 EV
default 0
A straightforward brightness fix, the same stops a camera’s own exposure compensation uses. Use it to correct a shot that came in too dark or too bright, before you start grading it, not a creative effect on its own.
Development
−2 – +2
default 0 · Pull / N / Push
Push and pull processing: rating film faster or slower than box speed, then adjusting development time to compensate. One slider drives three things together: contrast, grain character, and color saturation; the way a single push/pull decision affects all of them at once on real film. Push (positive) punches up contrast and grain; Pull (negative) flattens and softens both.
03
Optics
The physical, optical side of a shot: light behaving in and around the camera and film, not the chemistry that develops it.

Every module works the same way: switch it on or off without losing your tuning, reset it to the stock’s own saved values, remove it entirely, and dial its own Blend from 0 (skipped) to 1 (full strength, the default).
Optics can also hold custom modules you build yourself in the node graph editor, the same mechanism Film Chemistry uses. See Building Your Own Stock below.
04
Grain
Silver renders actual silver-halide crystals, live, rather than laying a canned noise texture over the image. So every slider here is a real physical property of the film, not an abstract “grain amount.”


Black & White
TOGGLE
Panchromatic B&W grain develops once, against a single luminance exposure, instead of independently per color channel: one layer of silver instead of three, so the image reads as neutral gray.
ISO
100 / 200 / 400 / 800 / 1600 / 3200
default 400
Real film speed, and the main thing that sets crystal size. Each stop roughly doubles it, from a fine 0.2μm at ISO 100 to a coarse 1.0μm at ISO 3200. This is the single biggest lever for “how grainy does this look,” faster stocks read visibly grainier.
Film Format
8mm / Super 8 / 16mm / Super 35 / 35mm
default 35mm
The physical negative size the shot was “on.” A larger negative needs less enlargement to reach the same output size, so identical crystals read finer. This is why a Super 35 or larger-format look reads smoother than 35mm even at the same ISO and Roughness.
Density
0 – 1
default 0.5
How long the image sat in the chemical solution. 0.5 is neutral; small values leave it underdeveloped, large values overdeveloped.
Roughness
0 – 1
default 0.5
How uneven individual crystals’ sizes are, on top of the average size set by ISO below.
Channel Correlation
0 – 1
default 0.3
Lower lets each color channel grain independently, which reads as flecks of color in the grain; higher pulls the three channels toward moving together, closer to how real color film mostly behaves.
Clump Unevenness
0.05 – 0.8
default 0.3
How much a crystal can crowd its neighbors. Low is fine, even grain; high lets occasional larger clumps stand out, the way real grain is never perfectly uniform.
Grain Shape
1 – 4
default 2.0
1 is round crystals; higher stretches each one into an elongated, “tabular” (T-grain) shape, closer to how most modern emulsions are actually built.
Blur
0 – 1
default 0.6
0 keeps grain sharp and finely detailed, but harsher; 1 softens it into a smoother film feel. Real grain sits somewhere in between, this is usually a small adjustment, not an extreme.
Layered Grain
TOGGLE
Blends two independent grain layers, different pattern, different blur, for a livelier, less uniform texture than one layer alone. On by default.
Second Layer Blur
0 – 1
default 0.2
Blur amount for that second layer, kept lower than the main Blur slider by default on purpose. One sharper layer and one softer layer contrast with each other, rather than doubling up on the same look.
Sharpen
0 – 1
default 0.0
A touch of sharpening laid over the grain. 0 is off; higher reads crisper and grainier at once.
05
Film Chemistry
Where the look actually comes from. Chemistry is what turns exposed silver into color and contrast in the first place, not a filter laid on top of a finished photo.


How chemistry is built
Two building blocks do most of the work for shipping silverstocks: Raw Coefficients is a stock’s whole base color response, solved directly from a photographed reference chart in Calibrate mode, the fast, accurate path to matching a real film stock. Halation, the warm bloom around bright highlights.
Beyond those two, Chemistry (like Optics) can hold custom modules built in Silver’s own node graph editor: real, live-rendered Metal shaders authored visually, no code required. See Building Your Own Stock below, and the Node Reference Library for a full catalog of what is available to wire together.
This stock’s whole base color response, solved directly from a photographed reference chart rather than hand-picked. Not yet solved: use Calibrate mode against a reference chart to solve it. Once solved, this module has no hand-editable sliders, it’s the scan’s own accurate fit; every module below layers further creative changes on top of it.
That warm red glow around bright highlights on real film: light passing through the emulsion’s blue, green, and red layers, bouncing off the film base, and traveling back up through them. Silver models that bounce per layer, so the warm color isn’t a tint someone chose; it falls out of red sitting closest to the base and catching the strongest reflection.
Radius (mm)
0.05 – 2.0 mm
default 0.72 mm
How far the glow spreads, measured in real millimeters on the film, not screen pixels, so the same value blooms wider on a smaller-format negative.
Threshold
0 – 0.99
default 0.8
How bright a highlight has to be before it starts blooming. Lower catches more of the frame; higher restricts it to the hottest points only.
Advanced
Ambient
0 – 0.3
default 0.1
A separate, much subtler effect: a little light reflects off the base everywhere, not just around blown highlights. Reads as a gentle overall softening and warmth rather than a second glow. Keep this low unless you want the whole frame to look slightly foggy.
Green Penetration
0 – 1
default 0.55
How much of the reflected light reaches the green film layer.
Blue Penetration
0 – 1
default 0.22
How much of the reflected light leaks back through the yellow filter, onto the film’s blue silver crystals.
Legacy modules
The original fixed chemistry stages, still fully functional, but to be deprecated.
06
Silverstock scope: Lens, Grade, and mixing stocks
A .silverstock file is not one indivisible look. It has four parts, Optics, Chemistry, Grain, and Adjustments, and any of them can be applied on their own, saved on their own, or left out of a given file entirely. This is what makes a stock the same shape whether it is a full film emulation, just a lens character, or just a grade.

Right-click any stock in the Browse grid (or use the same picker while saving one with Save As) to open Apply Scope. Three quick-picks cover the common cases, plus four individual toggles for anything in between:
Full Stock applies all four parts, the default for every stock and how every file saved before this feature existed behaves.
Lens applies Optics only: vignette, light leak, and any custom optics modules, without touching color or grain.
Grade applies everything but Optics: Chemistry, Grain, and Adjustments together, since all three are properties of the film’s own emulsion, not the glass in front of it.
Custom is any other combination of the four toggles.
A part left out of the mask is not erased from the file, it is just not applied or offered while that scope is active. Nothing is destructive.
Mixing stocks
Because scope is per-file, you can layer pieces from different stocks on the same photo: apply one stock as a Lens for its vignette and light leak character, then apply a completely different stock as a Grade for its color and grain, the same way you might shoot one lens on a camera loaded with someone else’s favorite film. Nothing forces a lens and a film stock to come from the same file.
07
Building your own stock
Three ways in, from a five-second tweak to building something no real film stock has ever done.
Tweak and save
Start from any built-in or downloaded stock, adjust whichever sliders you want across any of the five sections, and use Film Stock’s own Save As to keep it as a new stock. This is the fastest path, and the one most people never need to leave.
Solve from a real photograph
If you have an actual roll of film you want Silver to match, shoot a standard color reference chart on it, then use Calibrate mode (see Matching Real Film below) to solve Raw Coefficients directly from that photograph. This is how most of Silver’s own built-in stocks are made.
Build a custom module
For anything a slider cannot reach, open Tools → Module Editor to build a module from scratch in a visual node graph, the same live-rendered engine Silver’s own built-in modules run on. Wire together math, color, noise, blur, and masking nodes into whatever effect you want, attach the result to a stock’s Optics or Chemistry stack, and save it as a reusable .silvermodule file to reach for again on any other stock.
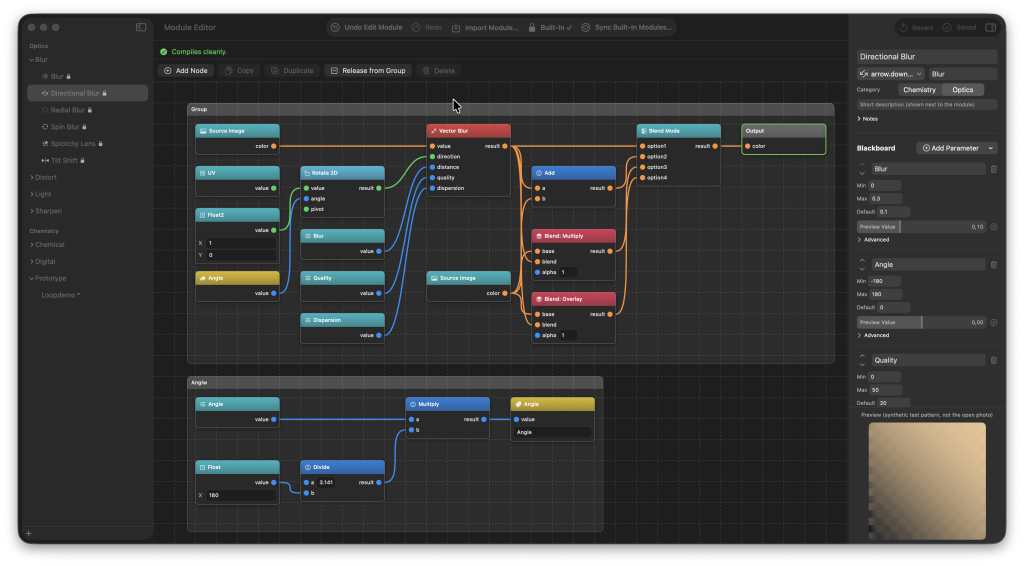
This is not limited to film emulation. A node graph can compute anything its nodes can express, so once you are working at this level, film chemistry is one thing you can build, not the only thing. See the Node Reference Library for a full catalog of every available node.
08
Matching real film
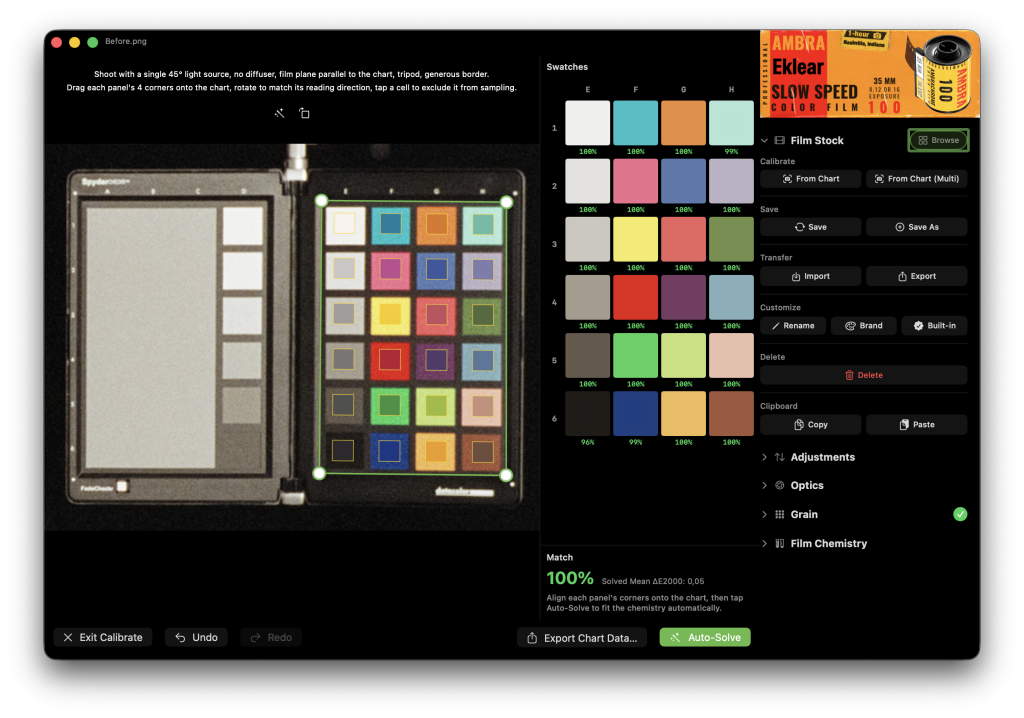
Calibrate mode is an experimental film-stock solver: shoot a standard color Macbeth chart on a real roll of film, and Silver builds a stock that matches it, rather than you hand-tuning sliders by eye.
01
Shoot the reference target
A single 45° light source, no diffuser, film plane parallel to the chart, on a tripod, with a generous border around the chart in frame.
02
Open the solver workspace
Drag each swatch panel’s four corners onto the chart, rotate to match its reading direction, and tap any cell to exclude it from sampling if it’s damaged or unreadable.
03
Match it yourself, or let it auto-solve
The reference sheet shows how good the current match is as you go, if you want to nudge chemistry sliders by hand. Or tap Auto-Solve to match automatically, anything above 80% is an excellent score! Auto-Solve always fits the Raw Coefficients module, a useful benchmark even while hand-tuning the rest of the stack.
04
Save it
Once you’re happy with the match, use Film Stock’s own Save option to keep the solved result as a silverstock file to use and to share. Auto solve is saved to the film chemistry as a Raw Coefficients -module.
Swatches overlay
Drag each panel’s 4 corners onto the chart, rotate to match its reading direction, tap a cell to exclude it from sampling.
Auto solve
Automatically match film chemistry to source image, always fitting the Raw Coefficients module regardless of what else is in the stack. This process can last multiple minutes.
09
Tips & gestures
A few interactions that aren’t obvious from looking at the panel.
Double-click any slider to reset it to the loaded film stock’s own default if one’s applied, or the plain default otherwise.
Right-click (or Control-click) a slider’s value to type an exact number instead of dragging.
Grain’s own section toggle (the switch next to its header) turns the whole effect off in one tap without losing your slider values. Optics and Film Chemistry work the other way: each module inside them has its own toggle instead, since either section can hold several independent modules at once.
Copy Settings / Paste Settings (in Film Stock) carries your entire current edit to another photo in one step.
Compare, under the photo two small slide switches, tap anywhere on either to flip it (no need to hit a specific side).
Split ⇆ Loupe changes what dragging on the photo does. Split wipes between before/after at the drag point; Loupe pops up a full-output-quality magnifier there instead.
Original ⇆ Processed swaps the whole photo between the untouched original and the current edit.
Right-click a stock in Browse (or Save As) to open Apply Scope and pick which of its four parts, Optics, Chemistry, Grain, Adjustments, actually apply. See Silverstock scope above.
Tools → Module Editor opens the node graph editor for building custom Optics or Chemistry modules from scratch. See Building your own stock above.